The Challenge:
Connect your local and remote repositories and push changes.
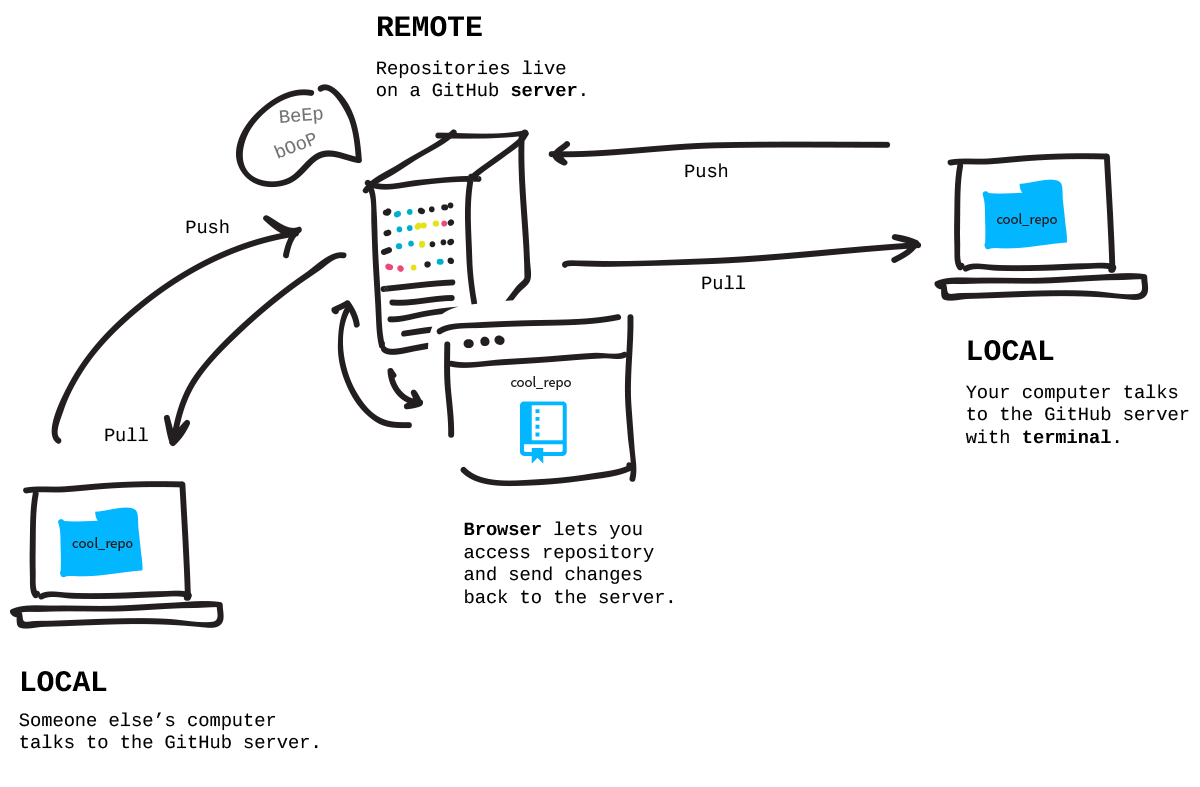
Remotes
When you put something on GitHub, that copy lives on one of GitHub's servers. This makes it a remote repository because it is not on your computer, but on a server, "remote" and somewhere else. By pushing your local (on your computer) changes to it, you keep it up to date.
Others can always get the latest from your project by pulling your changes down from the remote (and onto their computer). This is how everyone can work on a project together without needing access to your computer where your local copy is stored.
Step: Create a Remote Repository
You want to sync your local version with one stored on GitHub.com called the remote version. So first create an empty remote repository on GitHub.com.
- Go to github.com, log in, and click the '+' in the top right to create a new repository.
- Give it a name that matches your local repository's name, 'hello-world', and a short description.
- Make it public.
- Don't initialize with a README because we already have a file, locally, named 'readme.txt'.
- Leave .gitignore and license on 'none'.
- Click create repository!
Readmes, .gitignores and Licenses
These are common files in open source projects.
A readme explains what the project is, how to use it, and often times, how to contribute (though sometimes there is an extra file, CONTRIBUTING.md, for those details).
A .gitignore is a list of files that Git should not track, for instance, files with passwords!
A license file is the type of license you put on your project, information on the types is here: choosealicense.com.
We don't need any of them, however, for this example.
Step: Connect your Local to your Remote
Now you've got an empty repository started on GitHub.com. At the top you'll see 'Quick Setup', make sure the 'HTTP' button is selected and copy the address — this is the location (address) of your repository on GitHub's servers.
Back in your terminal, and inside of the 'hello-world' folder that you
initialized as a Git repository in the earlier challenge, you
want to tell Git the location of the remote version on GitHub's servers. You can have multiple remotes so each requires a name. For your main one, this is commonly named origin.
$ git remote add origin <URLFROMGITHUB>
Your local repository now knows where your remote one named 'origin' lives on GitHub's servers. Think of it as adding a name and address on speed dial — now when you need to send something there, you can.
A note:
If you have GitHub for Windows on your computer, a remote named 'origin' is automatically created. In that case, you'll just need to tell it what URL to associate with origin. Use this command instead of the 'add' one above:
$ git remote set-url origin <URLFROMGITHUB>
Step: Push Work to your Remote
Next you want to push (send) everything you've done locally to GitHub. Ideally you want to stay in sync, meaning your local and remote versions match.
Git has a branching system so that you can work on different parts of a project at different times. We'll learn more about that later, but by default the first branch is named 'master'. When you push (and later pull) from a project, you tell Git the branch name you want and the name of the remote that it lives on.
In this case, we'll send our branch named 'master' to our remote on GitHub named 'origin'.
$ git push origin master
Now go to GitHub and refresh the page of your repository. WOAH! Everything is the same locally and remotely. Congrats on your first public repository!
Verify with
git-it verify Go to the next challenge
git-it
Tips
- Add remote connections
- Set a URL to a remote
- Pull in changes
- View remote connections
- Push changes
$ git remote add <REMOTENAME> <URL>
$ git remote set-url <REMOTENAME> <URL>
$ git pull <REMOTENAME> <BRANCHNAME>
$ git remote -v
$ git push <REMOTENAME> <BRANCH>